WordPress meta data

Mastering WordPress Meta Data: Querying Posts and Users with Meta Data

When working with WordPress, it’s essential to understand how to query posts and users based on their meta data. By utilizing WP_Query and WP_User_Query, you can customize the results to meet specific requirements. In this article, we will explore these techniques in detail, providing professional explanations along with practical examples.

In order to customize what posts WordPress returns based on meta fields, we need to use WP_Query and specify a meta_query. If, for example, we had a custom post type called ‘films’ that had a custom field called ‘director’ we could query for films whose director was a director of one of the three Star Wars films.

Take a look at the code below and see if you can use your mastery of arrays that you gained in the last part to understand what is going on with the meta_query, which I will break down what is going on under the code.

As you can see we have an array of director’s names nestled inside of three other arrays. Let’s take it apart, piece by piece.

First, we start an array for our WP_Query args. After our first argument ‘post_type’, we begin an array to house our meta_query arguments.

Inside of that we specify which key to look for–in the case ‘director’. We also provide an array of values to search for in that key.

The last argument is how to compare those values, in this case we specify “IN” to retrieve any posts with these values in the key director.

What if we wanted films that where directed by a director of a Star Wars film, but wan’t to exclude the Star Wars Prequels? We can just add another array of arguments to our meta_query, but this time for value use an array of those films titles for the key film_title and for compare, use ‘NOT LIKE’ to exclude post that have these values in the film_title field.

Now WordPress will look for films by these three directors, whose title is not one of the three prequels.

So far I’ve shown you how to use WP_Query to find posts that have specific values for a custom field, but not how to show those fields.

Showing these fields is pretty much the same as before, but instead of using get_the_ID() to specify ID for get_post_meta() we specify it in an object context. So in our loop, which you can see below, the ID is retrieved a little differently using $query->post->ID.

Just like in the last part when we used WP_Query to find posts with certain values for various custom fields, we can use WP_Query‘s user table equivalent WP_User_Query.

For example, if we had a custom field called subscriber_level and wanted to find only those users who had the subscriber level of extra_special or super_special we could, much the same way we searched for films directed by the three directors of the Star Wars films:

5. Combining Different Queries

To further refine our user query, we can combine multiple comparisons and search for users with specific names alongside the desired subscriber levels. For example, let’s search for users named ‘Luke,’ ‘Han,’ or ‘Leia’ who also have the subscriber levels ‘extra_special’ or ‘super_special’:

In this article, we explored the process of querying posts and users by their meta data in WordPress. By mastering WP_Query and WP_User_Query, you can tailor your queries to retrieve specific results based on meta field values. The provided examples demonstrate how to construct and execute these queries effectively, empowering you to utilize WordPress as a powerful content management system.

Indexing Your WordPress Website

The Ultimate Step-by-Step Guide to Indexing Your WordPress Website on Google

Introduction:

Increasing organic search traffic is a goal for every website owner. Organic search drives 64% of total website traffic, making indexing by search engines essential. In this comprehensive guide, we will walk you through the process of indexing your WordPress website on major search engines like Google. By following these steps, you can boost your online visibility, drive organic traffic, and improve your search engine rankings.

What is indexing of a website?

Indexing is referred to search engine recording your web pages and showing it up every time a user look for the information similar to your web pages. Mostly, when a bot of search engine arrives at your website, it starts crawling. Based on ‘noindex’ or ‘index’ meta tags, the bot adds pages in the search engines with index tags.

How do you get your website indexed by all major search engines?

There are two ways to do that. One is to create a WordPress website and sit back and relax, while indexing happens naturally (which will take a long time) and the other one is putting some efforts and make it happen. If you’re ready to implement the second method, then continue reading.

1. Understand How Search Engines Work:

To effectively index your website, it’s crucial to understand how search engines like Google, Yahoo, and Bing operate. Search engines rely on spiders or bots that use algorithms to crawl and index web pages. Gone are the days of keyword stuffing for better rankings. Instead, focus on quality content, social signals, valid codes, and authoritative incoming links. Spiders note new documents and changes, processing and adding them to the search engine’s index.

In earlier days, you could force a bot to index and rank your webpages based on how many times a particular search keyword is used. But today, doing this will get you penalized. It doesn’t mean that keywords no longer helps a website getting indexed on the search engines but with that, you have to take care of few other things like social signals, valid codes, quality incoming links and much more. All of this won’t matter until spiders tell the search engines where to begin and that’s when indexing comes in.

Imp: Spiders will note down every time a new document and changes added to a webpage, and it’ll process it and note down the location. When a user searches for the information associated with the similar keywords, Spiders get to the work and find the links on pages and add them to the list of crawled pages.

So, it’s always important to check a recently published article to know that Google has already found it. You can use a site:domain.com to search the same and ensure your page is easy to find.

2. Publish High-Quality Articles and Blogs:

Regularly publishing in-depth, high-quality blog posts offers several benefits. Retailers report a high percentage of customers coming from blog posts, and recommendations from bloggers influence over 60% of purchase decisions. Create blog posts about your products or services, incorporating high-resolution images and relevant links. This practice helps search engine bots crawl and index your product pages effectively.

3. Create Quality Content and Build Backlinks

To enhance your website’s visibility in search results, focus on creating high-quality and valuable content for your audience. Regularly publish relevant articles, blog posts, or other forms of content that provide insightful information. Promote your content on social media platforms and try to earn backlinks from reputable websites within your niche. These backlinks act as a signal to Google that your website is trustworthy and authoritative, improving your chances of ranking higher in search results.

Developing a robust content marketing strategy further enhances your website’s indexing and visibility. Consider guest posting on niche-related sites, publishing press releases on reputable platforms, and utilizing article directories. Additionally, creating videos hosted on major platforms like YouTube or Vimeo can drive engagement and improve indexing. Avoid spammy sites and focus on providing valuable content to reputable sources. Simply:

  • Write GPs (Guest posts) and submit it the sites similar to your niche
  • Create PRs (Press releases) and publish them on PR sites.
  • Blogs on article directories.
  • Prepare videos and host on major platforms like Youtube or Vimeo.

Note: Don’t try shortcuts by posting your content on spammy sites as Google will then consider your site as spammy too.

4. Utilize Google Analytics:

Google Analytics is an essential tool for understanding your website’s performance. Setting up Google Analytics signals to Google that your website is active, potentially triggering the indexing and crawling process. This tool provides valuable insights into user visits, page duration, pageviews, and more. Additionally, it offers advanced features like conversion tracking and goal setting for comprehensive website analysis.

Also, you can use it for advanced tricks like tracking conversions and setting goals.

5. Submit Your Website to Google Search Console (GSC):

Google Search Console (GSC) is a powerful tool that allows you to monitor and control your website’s indexing on Google. It provides insights into visibility, errors, keyword rankings, and more. Use GSC to improve indexing and crawling, ensure indexability by bots, fix HTML issues, and submit your website’s sitemap to Google.

Helps bloggers:

  • To monitor visibility on search engines and ‘404 not found’ errors.
  • To know the keywords, their sites are ranking for.
  • In Improving the sire indexing and crawling
  • To monitor if a website is indexable by bots
  • Issues that need fixing like HTML improvements
  • Submitting the sitemap to Google

6. Submit Your Website’s URL to Search Engines:

Submitting your website’s URL directly to search engines like Google and Bing helps expedite the indexing process. In Google, log in to your account, navigate to Webmaster Tools, and submit your URL using the “submit URL” option. Similarly, submitting your URL to Bing will automatically include it in Yahoo’s search results.

7. Optimize Your Sitemap

Create and optimize an XML sitemap that lists all your website’s pages. This helps search engines quickly identify changes and updates to your website. Follow Google’s instructions to add an HTML file or utilize a plugin to generate and submit your sitemap. Update your sitemap whenever you make changes to your content or add new pages.

There is no restriction on how many times you can submit the sitemap to Google but just ensure that every time you are updating the content or images, add a sitemap.

8. Verify Indexing Status:

Once you have submitted your XML sitemap, you need to wait for Google to process it and index your website. This process may take a few hours to a few days. To check the indexing status, go to the Google search engine and type “site:yourdomain.com” (replace “yourdomain.com” with your actual domain). If Google has indexed your website, you should see a list of pages from your site in the search results.

9. Leverage Social Media:

Harness the power of social media platforms to generate traffic and improve the indexing of your website. Establish a presence on platforms like Facebook, Twitter, LinkedIn, and YouTube. Create engaging posts that include links pointing back to your website. Sharing your content on social media not only increases its visibility but also encourages social signals and interactions, which search engines take into account when determining the relevance and popularity of your website. Additionally, engage with your audience, participate in relevant communities and discussions, and encourage social sharing of your content to further amplify its reach and impact.

10. Install and Configure an SEO Plugin (Optional):

While not mandatory, installing an SEO plugin can further optimize your WordPress website for search engines. Popular plugins like Rank Math, Yoast SEO, All in One SEO Pack, and Rank Math provide features to improve your website’s SEO. Install your preferred SEO plugin from the WordPress Plugin Directory and configure the settings according to the provided documentation. Ensure that your XML sitemap is generated and submitted to Google using the SEO plugin.

Bonus:

Perhaps, you know that if you submit a URL to a blog directory, it’ll help your site indexed by not and will easily be found by potential users, and if you know the right way to do it, it’ll make indexing quicker than usual. Submit your URLs to only best authority and industry blogs if you need to get in the top search results of search engines. Not only it will open up your content to new traffic but also helps you with incoming links that are easy to crawl and index by search engines. Isn’t that you need?

Now, you have seven efficient methods for getting your website indexed by search engines to drive more and more traffic.

It isn’t an exhaustive list as there are techniques like bookmarking, commenting on various forums and much more. The point is there are various techniques and methodologies arises on the daily basis when it comes to search engine ranking. So, stay updated and use everything you can for better ranking of your website.

Conclusion:

Indexing your WordPress website on search engines is vital for increasing organic traffic and improving your search engine rankings. By understanding search engine algorithms, consistently publishing high-quality content, utilizing tools like Google Analytics and Search Console, and optimizing your sitemap, you can ensure effective indexing and better visibility in search results. Stay updated with the latest techniques and methodologies to continually improve your website’s ranking.

WordPress 6.3 Beta 3

Test the new features in WordPress 6.3 Beta 3

Introduction:

WordPress, the popular content management system (CMS), has been empowering millions of websites worldwide for over a decade. With each new release, WordPress brings along exciting features, enhancements, and improvements to make website management more efficient and user-friendly. In this blog post, we will dive into the remarkable features introduced in WordPress 6.3, the latest version as of July 2023. Let’s explore the updates that have made managing and designing websites even more enjoyable and hassle-free.

  1. Enhanced Block Editor: One of the standout features in WordPress 6.3 is the enhanced Block Editor. The Block Editor, also known as Gutenberg, revolutionized content creation by introducing a modular approach with blocks. In WordPress 6.3, the Block Editor has been further refined to offer a more intuitive and streamlined editing experience. The user interface has been improved, making it easier to navigate and work with blocks.

With WordPress 6.3, the Block Editor introduces new block patterns and layout options. These pre-designed block patterns allow users to create complex page layouts effortlessly. Whether it’s a stylish hero section or a beautiful gallery, block patterns provide a quick and convenient way to add visually appealing elements to your content.

  1. Global Styles and Preferences: In WordPress 6.3, the introduction of Global Styles and Preferences takes website customization to the next level. With Global Styles, users have more control over the appearance of their websites. Instead of manually adjusting the design settings for each page, users can define and apply consistent styles across multiple pages or the entire site.

Global Styles allow users to manage fonts, colors, spacing, and other style attributes effortlessly. This feature ensures a cohesive look and feel throughout the website, making it easier to maintain a consistent brand identity. With Global Preferences, users can set default options for blocks and customize their editing experience, saving time and effort in the long run.

  1. WebP Support: In the fast-paced digital landscape, optimizing website performance is crucial. WordPress 6.3 addresses this by adding native support for the WebP image format. WebP is a highly efficient image format that offers smaller file sizes without compromising image quality. By utilizing WebP, website owners can significantly improve page load times, enhancing the overall user experience and SEO performance.

With WordPress 6.3, uploading WebP images is a breeze. The CMS automatically detects whether the user’s browser supports WebP and serves the appropriate format. This seamless integration of WebP support empowers website owners to deliver high-quality visuals while keeping their sites lightweight and fast.

  1. Full-Site Editing: One of the most anticipated features in WordPress 6.3 is Full-Site Editing. With Full-Site Editing, users can design and modify entire web pages using blocks, providing more flexibility and creative control. Previously, users primarily used the Block Editor for creating content within the content area of a page. Now, with Full-Site Editing, users can personalize headers, footers, sidebars, and other global elements.

This feature opens up a world of possibilities for website owners, allowing them to create unique and visually stunning websites. Users can experiment with different layouts, arrange blocks in creative ways, and easily customize every aspect of their site. Full-Site Editing empowers users to unleash their creativity and build websites that truly represent their vision.

  1. Improved Security Measures: Website security is of paramount importance, and WordPress 6.3 prioritizes it by introducing improved security measures. The latest version includes enhanced protection against common security vulnerabilities, ensuring a more robust and secure platform for website owners.

Additionally, WordPress 6.3 integrates security plugins, making it easier for users to monitor and safeguard their websites against potential threats. The CMS provides recommendations for trusted security plugins, enabling users to fortify their websites with additional layers of protection. This proactive approach to security demonstrates WordPress’s commitment to keeping websites safe and secure.

Conclusion:

WordPress 6.3 brings a plethora of exciting features and enhancements, revolutionizing the way websites are managed and designed. The enhanced Block Editor, Global Styles and Preferences, Full-Site Editing, WebP support, and improved security measures all contribute to a more seamless and enjoyable website management experience.

Whether you’re a seasoned WordPress user or new to the platform, WordPress 6.3 is definitely worth exploring to unlock the full potential of your website. The new features empower website owners and content creators to take their online presence to new heights, offering improved customization options, faster-loading pages, and enhanced security. Stay up-to-date with WordPress updates to make the most out of this powerful CMS and elevate your website to new levels of success.

Why Choose WordPress for Your Website

Why Choose WordPress for Your Website: A Comprehensive Analysis

Introduction:

When it comes to building a website, choosing the right platform is essential for success. With numerous options available, WordPress stands out as a leading choice for businesses, bloggers, and individuals alike. Powering over 40% of all websites on the internet, WordPress offers a wide range of features and benefits that make it the go-to platform for website creation. In this blog post, we will explore 10 compelling reasons why choose WordPress for your website.

In this article we unlock the potential of your website with these 10 compelling reasons why choose WordPress for your website. Discover why choosing WordPress can lead to success and empower your online presence.

  1. User-Friendly Interface:

One of the biggest advantages of WordPress is its user-friendly interface. Whether you are a seasoned developer or a beginner with no coding experience, WordPress offers an intuitive and easy-to-use platform. Its dashboard provides a clean and organized layout, allowing you to navigate through different sections effortlessly. The WYSIWYG (What You See Is What You Get) editor enables you to create and edit content in a visual manner, making it simple to build and customize your website. This is the first reason why choose WordPress for your website.

  1. Extensive Theme Selection:

WordPress offers a vast collection of themes that cater to various industries, styles, and preferences. With thousands of free and premium themes available, you can easily find one that matches your brand identity and desired aesthetics. Themes allow you to change the look and feel of your website instantly, without any coding knowledge. Whether you want a professional and corporate design or a vibrant and creative layout, WordPress has a theme to suit your needs.

  1. Plugin Ecosystem for Functionality:

WordPress boasts a robust plugin ecosystem that extends the functionality of your website. With over 50,000 plugins available, you can easily add features and enhance your website’s capabilities. Plugins range from simple tools like contact forms and social media integrations to more advanced functionalities like e-commerce, SEO optimization, and analytics. This flexibility allows you to tailor your website to meet specific requirements and grow as your needs evolve.

  1. Search Engine Optimization (SEO) Friendliness:

WordPress is designed with search engine optimization in mind. Its clean code, semantic markup, and easy integration with SEO plugins make it a powerful tool for improving your website’s visibility in search engine results. Popular plugins like Rank Math, Yoast SEO offer valuable features such as meta tag customization, XML sitemap generation, and content optimization tips. With WordPress, you have the advantage of a solid foundation for implementing effective SEO strategies and driving organic traffic to your website. This is one of the important reason why choose WordPress for your website.

  1. Mobile Responsiveness:

In the age of mobile devices, having a responsive website is crucial. WordPress themes are designed to be mobile-friendly, ensuring that your site looks and functions flawlessly across various screen sizes and devices. Whether visitors are accessing your website on a desktop, smartphone, or tablet, the responsive design automatically adjusts and optimizes the layout for optimal viewing and user experience. This not only improves user engagement but also positively impacts your search engine rankings.

  1. Scalability and Flexibility:

WordPress is highly scalable and flexible, making it suitable for websites of all sizes. Whether you’re starting with a simple blog or planning to expand into a large e-commerce store, WordPress can accommodate your growth. With its modular architecture and plugin ecosystem, you can easily add new functionalities, create additional pages, and integrate third-party services as your website evolves. WordPress empowers you to scale your website according to your needs, without limitations.

  1. Community Support:

WordPress has a vibrant and supportive community of developers, designers, and users worldwide. The community actively contributes to the improvement of the platform, shares knowledge, and offers assistance. WordPress forums, online tutorials, and official documentation provide valuable resources for troubleshooting, learning new techniques, and staying updated with the latest trends. The community support ensures that you have access to a wealth of knowledge and expertise, empowering you to make the most of your WordPress website. This is another important reason why choose WordPress for your website.

  1. Regular Updates and Security:

WordPress is continuously updated to enhance performance, security, and functionality. The core development team regularly releases updates, patches, and bug fixes to address any vulnerabilities and ensure a secure platform. Additionally, reputable plugin developers also provide regular updates for their plugins, further enhancing the security and stability of your website. By keeping your WordPress installation and plugins up to date, you can safeguard your website against potential security threats.

  1. Integration with Social Media:

In today’s digital landscape, social media plays a crucial role in driving traffic and engaging with your audience. WordPress seamlessly integrates with various social media platforms, allowing you to share your content, display social media feeds, and encourage social sharing. With the help of plugins, you can easily add social media buttons, embed Instagram feeds, and automatically share your latest blog posts on social networks. This integration helps you amplify your online presence and connect with your audience across different channels.

  1. Cost-Effective Solution:

Building a website can be costly, especially if you opt for custom development. However, WordPress provides a cost-effective solution without compromising on quality. The platform itself is free to use, and there are numerous free themes and plugins available. While premium themes and plugins may come with a price tag, they often offer advanced features, professional designs, and dedicated support. Additionally, hosting and domain costs for WordPress websites are typically affordable, making it a budget-friendly option for individuals and small businesses. This is one last but not least reason why choose WordPress for your website.

Conclusion:

WordPress continues to dominate the website creation landscape for good reason. With its user-friendly interface, extensive theme and plugin selection, SEO-friendliness, mobile responsiveness, scalability, community support, regular updates, and cost-effectiveness, it offers a comprehensive solution for building websites of all types and sizes. Whether you’re a business owner, blogger, or creative professional, WordPress provides the tools and resources to bring your online vision to life. Embrace the power of WordPress and unlock the endless possibilities for your next website. I think we explain enough why choose WordPress for your website.

Know That Your WordPress Website is Hacked

As a website owner, ensuring the security of your WordPress website is crucial. Unfortunately, no platform is entirely immune to hacking attempts, and WordPress is no exception. Hackers may target WordPress websites due to its popularity and wide usage. Detecting a hacked website early is essential to minimize potential damage and safeguard your online presence. In this blog post, we will explore some common signs that indicate your WordPress website might have been hacked.

1.Sudden Drop in Website Traffic

If you look at your Google Analytics reports and see a sudden drop in traffic, then this could be a sign that your WordPress site is hacked.

There are many malware and trojans out there that hijack your website’s traffic and redirect it to spammy websites. Some of them don’t redirect logged in users which allows them to go unnoticed for a while.

Another reason for the sudden drop in traffic is Google’s safe browsing tool, which might be showing warnings to users regarding your website.
Each week, Google blacklists around 20,000 websites for malware and around 50,000 for phishing. That’s why every blogger and business owner needs to pay serious attention to their WordPress security.

You can check your website using the Google’s safe browsing tool to see your safety report.

2. Bad Links Added to Your Website

One of the most common signs among hacked WordPress websites is data injection. Hackers create a backdoor on your WordPress website which gives them access to modify your WordPress files and database.

Some of these hacks add links to spammy websites. Usually these links are added to the footer of your website, but they really could be any where. Deleting the links will not guarantee that they will not come back.

You will need to find and fix the backdoor used to inject this data into your website. See our guide on how to find and fix a backdoor in a hacked WordPress site.

3. Your Site’s Homepage is Defaced

This is probably the most obvious one as it is clearly visible on the homepage of your WordPress website. Most hacking attempts do not deface your site’s home page because they want to remain unnoticed for as long as possible.

However, some hackers may deface your website to announce that it has been hacked. Such hackers usually replace your homepage with their own message. Some hackers may even try to extort money from site owners.

WordPress Website

4. You are Unable to Login to WordPress

If you are unable to login to your WordPress website, then there is a chance that hackers may have deleted your admin account from WordPress.

Since the account doesn’t exist, you would not be able to reset your password from the login page. There are other ways to add an admin account using phpMyAdmin or via FTP. However, your site will remain unsafe until you figure out how a hacker got into your website.

5. Suspicious User Accounts in WordPress

If your site is open to user registration, and you are not using any spam registration protection, then spam user accounts are just common spam that you can simply delete.

However, if you don’t remember allowing user registration and notice new user accounts in WordPress, then your site is probably hacked.

Usually the suspicious account will have administrator user role, and in some cases you may not be able to delete it from your WordPress admin area.

6. Unknown Files and Scripts on Your Server

If you’re using a site scanner plugin like Sucuri, then it will alert you when it finds an unknown file or script on your server.

You need to connect to your WordPress site using a FTP client. The most common place where you will find malicious files and scripts is the /wp-content/ folder.

Usually, these files are named like WordPress files to hide in plain sight. Deleting these files immediately will not guarantee that these files will not return. You will need to audit the security of your website specially file and directory structure.

7. Your Website is Often Slow or Unresponsive

All websites on internet can become victims of random denial of service attacks. These attacks use several hacked computers and servers from all over the world using fake ips. Sometimes they are just sending too many requests to your server, other times they are actively trying to break into your website.

Any such activity will make your website slow, unresponsive, and unavailable. You will need to check your server logs to see which ips are making too many requests and block them.

It is also possible that your WordPress site is just slow and not hacked. In that case, you need to follow our guide to boost WordPress speed and performance.

8. Unusual Activity in Server Logs

Server logs are plain text files stored on your web server. These files keep record of all errors occurring on your server as well as all your internet traffic.

You can access them from your WordPress hosting account’s cPanel dashboard under statistics.

These server logs can help you understand what’s going on when your WordPress site is under attack. They also contain all the ip addresses used to access your website which allows you to block suspicious ip addresses.

9. Failure to Send or Receive WordPress Emails

Hacked servers are commonly used for spam. Most WordPress hosting companies offer free email accounts with your hosting. Many WordPress website owners use their host’s mail servers to send WordPress emails.

If you are unable to send or receive WordPress emails, then there is a chance that your mail server is hacked to send spam emails.

10. Suspicious Scheduled Tasks

Web servers allow users to set up cron jobs. These are scheduled tasks that you can add to your server. WordPress itself uses cron to setup scheduled tasks like publishing scheduled posts, deleting old comments from trash, and so on.

A hacker can exploit cron to run scheduled tasks on your server without you knowing it.

11. Hijacked Search Results

If the search results from your website show incorrect title or meta description, then this is a sign that your WordPress website is hacked.

Looking at your WordPress website, you will still see the correct title and description. The hacker has again exploited a backdoor to inject malicious code which modifies your site data in a way that it is visible only to search engines.

12. Popups or Pop Under Ads on Your Website

These types of hacks are trying to make money by hijacking your website’s traffic and showing them their own spam ads for illegal websites. These popups do not appear for logged in visitors or visitors accessing a website directly.

They only appear to the users visiting from search engines. Pop under ads open in new window and remain unnoticeable by users.

Conclusion:

Maintaining a secure WordPress website is crucial to protect your online presence and ensure the safety of your visitors. By staying vigilant and regularly checking for the signs mentioned above, you can detect a hacked WordPress website early on and take appropriate action. If you suspect that your WordPress site has been compromised, it’s essential to seek professional assistance or consult WordPress security resources to mitigate the damage and restore the integrity of your website. Remember, prevention and proactive security measures are key to keeping your WordPress Website safe from potential hackers.

Speed up WordPress website

15 Easy Ways to Speed Up WordPress Website

When it comes to running a successful website, speed is of the essence. A slow-loading website can lead to frustrated visitors, increased bounce rates, and a negative impact on your search engine rankings. Fortunately, there are several easy steps you can take to optimize the performance of your WordPress website. In this blog post, we will explore 15 simple and effective ways to speed up WordPress website and enhance the user experience.

  1. Choose a Reliable Hosting Provider: Start by selecting a reputable hosting provider that specializes in WordPress hosting such as Cloudways, WP Engine or SiteGround. A reliable host will ensure that your website is hosted on a server optimized for speed and performance, leading to faster loading times.
  2. Opt for a Lightweight and Optimized Theme: Choose a lightweight and optimized WordPress theme that is designed for speed. Avoid themes with excessive features and complex code that can slow down your website. Opt for a clean and minimalist design that prioritizes speed.
  3. Install a Caching Plugin: Caching plugins generate static HTML files of your dynamic WordPress pages, reducing the server load and improving load times. Install a caching plugin like W3 Total Cache or WP Super Cache to optimize the caching process and speed up WordPress website.
  4. Enable GZIP Compression: Enable GZIP compression on your server to compress your website’s files before they are sent to visitors’ browsers. GZIP compression reduces file sizes and speeds up content delivery, resulting in faster page loading times.
  5. Optimize Images: Optimize your images to reduce their file sizes without compromising quality. Large image files can significantly slow down your website. Utilize plugins such as Smush or ShortPixel to automatically compress and optimize images upon upload.
  6. Minify CSS and JavaScript: Minifying CSS and JavaScript files involves removing unnecessary characters, white spaces, and comments. Minification reduces file sizes and improves loading times. Plugins like Autoptimize or W3 Total Cache can handle this task effortlessly.
  7. Utilize a Content Delivery Network (CDN): A CDN stores your website’s static content on servers distributed worldwide. When a user accesses your site, the CDN delivers the content from the server closest to their location, minimizing latency and improving load times. Cloudflare and StackPath are popular CDN options for WordPress websites.
  8. Implement Lazy Loading: Lazy loading defers the loading of images and videos until they come into view on the user’s screen. By implementing lazy loading, you can improve initial page load times and reduce the overall bandwidth consumption. Consider using the Lazy Load by WP Rocket plugin for easy implementation.
  9. Evaluate and Minimize Plugins: Each installed plugin adds extra code and potential performance overhead to your website. Evaluate your plugins and deactivate or delete any unnecessary or unused ones. Keeping only essential plugins will help streamline your website and speed up WordPress website.
  10. Optimize Your WordPress Database: Regularly optimize your WordPress database to remove unnecessary data such as spam comments, post revisions, and unused tables. Plugins like WP-Optimize or WP-Sweep can help you automate this process and keep your database clean and efficient.
  11. Limit Post Revisions: By default, WordPress saves multiple revisions of each post, which can increase the size of your database. Set a limit on the number of post revisions stored to reduce the database size and improve performance. Add the following line to your wp-config.php file:
    define('WP_POST_REVISIONS', 3);//(replace 3 with your desired number of revisions).
  12. Clean Up Your Media Library: Remove any unused images, videos, or other media files from your WordPress media library. Having a cluttered media library can slow down your website and make it harder to find the files you need. Regularly clean up and organize your media library to improve performance.
  13. Optimize Your Homepage: Your homepage is often the first point of contact for visitors, so it’s crucial to optimize it for speed. Consider implementing the following measures:
    • Show excerpts instead of full posts: Displaying excerpts of your blog posts on the homepage reduces the amount of content that needs to load initially.
    • Limit the number of posts: Display a moderate number of posts on your homepage, typically between 5-7, to avoid overwhelming visitors and improve loading times.
    • Remove unnecessary sharing widgets: Sharing widgets can add additional scripts and slow down your homepage. Consider including them only in individual blog posts instead.
    • Remove inactive plugins and widgets: Unused plugins and widgets contribute to the overall bulk of your homepage. Delete any that are not necessary to streamline its performance.
    • Keep it minimal: Focus on providing relevant and engaging content on your homepage, rather than cluttering it with excessive widgets and elements.
  14. Enable Browser Caching: Browser caching allows elements of your website to be stored on visitors’ browsers, enabling faster loading times upon subsequent visits. By setting an appropriate expiration date for static resources in your .htaccess file, you can optimize browser caching and improve overall speed.
  15. Monitor and Optimize: Speed optimization is an ongoing process. Regularly monitor your website’s performance using tools like Google PageSpeed Insights or GTmetrix. Identify any areas that need improvement and implement necessary changes. Stay updated with the latest speed optimization techniques to ensure your WordPress website continues to perform optimally.

Conclusion:

A fast-loading website is essential for providing a positive user experience and optimizing search engine rankings. By implementing these 15 easy ways to speed up WordPress website, you can significantly enhance its performance and keep visitors engaged. Remember, website speed optimization is an ongoing process, so continue to monitor and optimize your site to ensure it remains fast and efficient.

15 Common WordPress Errors With Solutions

Common WordPress Errors

We all love WordPress, but sometimes it can drive us crazy! Whether its the dreaded white screen of death, an unknown PHP error coming from a plugin, server issues or any other WordPress error causing our site to crash, it’s never fun. But whenever WordPress decides to act up, don’t worry yourself at all – there is always a solution as you’re going to learn in this post. Get ready to have fun because you and me are going to solve 15 common WordPress errors. So without further ado, let’s start with the most common WordPress error.

1. Internal Server Error

Almost every WordPress user I know has encountered the internal server error at least once. It’s quite annoying because, unlike many common WordPress errors, the internal server error does not tell you what you need to fix. This can be frustrating since the error can be a result of several reasons as you’ll see below.

Internal Server Error Causes:

Some of the possible causes for the Internal Server error are the following:

Internal Server Error Solutions:

This error can easily send a beginner into panic mode but worry not, here are some solutions.

a. Edit .htaccess file
Since the internal server error is mainly a result of a corrupted .htaccess file, login into your WordPress root directory via File Manager (or FTP) and rename your .htaccess file to .htaccess.old. Refresh your browser to see if you solved the error. If the error disappeared, go to Settings -> Permalinks and click on the Save Changes button to reset your .htacess and flush write rules. If this does not work, perhaps you need to check your plugins.

b. Deactivate all plugins
A plugin you just installed could be the problem, but that’s great because you know what to uninstall or delete. Other times, this WordPress error may crop up as a result of an old plugin (or several plugins that are incompatible). You won’t know for sure if the problem is your plugins unless you deactivate the plugins.

c. Change Themes
If the problem was not the plugins, perhaps your theme is. Switch to the Twenty Twelve theme and reload your website. If you’re still seeing the error, perhaps you need to upgrade some of your WordPress folders.

d. Repair the wp-admin and wp-includes folders
By this point, you’ve probably solved this WordPress error. But if this is not the case, try replacing your wp-admin and wp-includes folders with newer ones from a fresh WordPress install.

e. Increase your PHP memory Limit
If everything else fails, you have to get down and dirty and mess with a few things on your server. The internal server error can be frustrating, so I don’t expect anything to stop you. Here is a great guide on increasing PHP memory by the good guys at WordPress.If you like taking shortcuts, fire up your code editor and create a text file named php.ini. Inside this file, add this code:

memory=64MB

Save and upload the file to the /wp-admin/ folder. If increasing your PHP memory solves the problem, talk to your web host to put a finger on what is exhausting your memory. It could be anything from broken theme functions to poorly designed plugins among other things. Your web host will furnish you with information from your server logs.

2. Auto-Update Failed

WordPress now comes with an auto-update feature that takes care of security, minor bugs and such like things. The feature is pure genius at work. It’s great but sometimes it fails. Considering the auto-update feature does not require any human input, how do you tell when the update fails? You will see one of the following:

  • A PHP error message
  • A blank white screen (Also known as the white screen of death – WSOD)
  • A warning that says the update failed

Update Failed Causes:

  • Internet connection problems during auto-update
  • Broken connection with main WordPress files
  • Incorrect file permissions

Update Failed Solution:

Update your WordPress website manually. If you don’t know where to start, please check out this Updating WordPress – Manual Update post at WordPress Codex.

3. Syntax WordPress Error

My analysis showed that this is a very common WordPress error among people who add code snippets to their WordPress sites. When you encounter this error, you will usually notice something like:

Parse error - syntax error, unexpected $end in /public_html/your_site/wp-content/themes/your-theme/functions.php on line 38

This error needn’t stress you out for it tells you exactly where to find the problem.

Syntax Error Cause:

Many a time, the syntax error is caused by some missing or unexpected character(s) in the problematic file. Most of the time caused by someone less experienced trying to edit the code in a theme or plugin but it could also occur when you’ve installed a new theme or plugin that contains the error.

Syntax Error Solutions:

a. Educate yourself on pasting code snippets into WordPress
As a WordPress beginner, you have a long (but fun) way to go as far as learning WordPress development is concerned. There is no hurry though, so take your time. If you encountered this WordPress error after adding code snippets into your WordPress website, you need to learn more about pasting code snippets into WordPress or you will cause more damage.

b. Fix the affected code
If this WordPress error occurred after updating a plugin or pasting some code from the web, you know exactly where to look. The problem is you can’t fix your code via Appearance -> Editor (or Plugins -> Editor) since the syntax error locks you out of your website.This doesn’t auger well with most beginners, so they freak out. But don’t be, you can easily edit your WordPress files via FTP or File Manager in your cPanel. Find the affected file and fix the code either by removing it or rewriting it correctly.

c. Try a different theme or plugin
If the error began when you activated a new theme or plugin then it’s most likely an error in that theme or plugin. So you might want to find an alternative one or contact the developer so they can fix the error. In some cases you might not be able to log into WordPress in which case you might have to delete the plugin or theme via FTP.

4. Error Establishing A Database Connection

Of the common WordPress errors, this is pretty self-explanatory. The error lets you know something broke the connection to your WordPress database.

Database Establishing Error Causes:

  • wp-config.php error
  • Problems with your hosting provider
  • You’ve been hacked! And here I was thinking this particular WordPress error is no big deal.

Database Establishing Error Solutions:

a. Edit your wp-config.php file
Access your wp-config.php file via File Manager or FTP and confirm if the database name, host, username and password are correct. If you’re stuck or don’t know what to do first, consider teaching yourself a few things about editing wp-config.php files.

b. Fix issues with your web host
If your wp-config.php is looking right and this WordPress error is still a problem, you should talk to your WordPress hosting provider. They will be able to tell you whether the server is down or your database was shut down for exceeding its quota. If they tell you everything looks good on their end, it is time to implement some WordPress security on your site.

c. Scan your website to determine if it’s compromised
Hackers don’t sleep. No, they don’t. You can fall victim to a hacker anytime, especially if you don’t know how to secure your WordPress website. To ensure your website hasn’t been hacked, scan it using a tool such as Sucuri Sitecheck. If you get bad news, just stay calm and check out this my site was hacked post over at WordPress Codex.

5. Briefly Unavailable For Scheduled Maintenance Error

1, 2, 3… Break time over, let’s try and understand why you’re getting this not-so-brief WordPress error. Oh, by the way, it shouldn’t trouble you at all since it’s quite easy to solve. But first, let’s look at the causes.

Scheduled Maintenance Error Causes:

  • Your WordPress update failed because some things are beyond your control
  • The .maintenance file was not deleted after the update for one reason or another

Scheduled Maintenance Error Solutions:

Are you having fun? Do you feel you can solve the above errors if/when they crop up? If you can, let’s move on to WordPress error number six (6).

6. Email Password Retrieval Does Not Work

The main cause for this is forgetfulness. Perhaps you should try some memory enhancing diet and exercises ? Kidding aside…we all forget even the most important of things such as passwords, usernames and email addresses? As it were, you forgot your password and were forced to use the “Lost Your Password” page. The problem is you never received the reset link via email. You decide to try again after checking your spam folder but still, no link.

Password Retrieval Error Cause:

For some reason your WordPress installation just won’t send you the link…the cause could be a mystery! But the main problem isn’t why you aren’t receiving your password but how can you actually reset your password easily and quickly? We’ll, below are a couple solutions.

Password Retrieval Error Solutions:

a. Reset your WordPress via phpMyAdmin
This is the more technical of the two solutions I’ll present you with.

  1. Login into your cPanel and navigate to phpMyAdmin under Databases
  2. Select your database (Your web host will help you can’t find your database)
  3. Navigate to wp_users and click on Browse
  4. Go to your username and click on Edit
  5. Enter a new value (your new password) into user_pass
  6. Choose MD5 from the drop-down menu that’s under Function
  7. Click Go button at the bottom to save your changes

b. Edit your functions.php file
And now for a slightly less technical method. The functions.php file is responsible for many a thing on your WordPress website. If your email password retrieval is giving you a hard time:

  1. Navigate to “../wp-content/themes/your_live_theme/” using FTP or File Manager and download the functions.php file.
  2. Open the file in your code editor and add the following code:
    wp_set_password('DesiredNewPassword', 1);

    Replace DesiredNewPassword with your new passowrd. Number one (1) in the code is your user ID number in the wp_users table.

  3. Save and upload functions.php
  4. When you can login into your website, eliminate the code (download functions.php, delete code and upload it back to your theme folder)

7. HTTP Error 403 – Forbidden

If you get “You are not authorized to view this page. (403 error)” message when trying to login into your WordPress website, you’ve encountered one of the most common WordPress errors – the HTTP Error 403.

HTTP 403 Error Cause:

  • Problems with Directory Indexes if your blog is hosted on a Windows server

HTTP 403 Error Solution:

Add index.php to the Directory Indexes. You can solve this WordPress error easily by adding index.php to the Directory Indexes. Just go to your Control Panel -> Web Options -> Directory Indexes and add index.php.

8. Sidebar Below Content Error

I was quite perplexed when I first encountered this WordPress error. I was so convinced my theme was completely toast that I contemplated changing it altogether. However, I summoned Google spiders and a few seconds later, I realized this was just one of the most common WordPress errors. This realization took away all the worrying. A few more clicks and scrolls, I found the causes.

Sidebar Below Content Error Causes:

  • HTML errors – sometimes you might forget to close a few div elements
  • CSS errors – Other times, you might accidentally use disproportionate widths that end up messing up your entire layout

Sidebar Below Content Error Solutions:

a. Close all div elements
In most cases, pen div elements are responsible for this error. Close all open div elements and eliminate extra div elements that pushes the sidebar outside the wrap element. Use a tool such as W3 Validator to check if your HTML code could be the cause of this error.

b. Fix your CSS
Improper width ratios will mess up your layout in turn placing your sidebar below the content area. You need to keep things in proportion. For instance, if your main container is 920px in width, allocate 620px to your content and 250px to your sidebar. Leave the remaining 50px to margins and what not. Just keep things proportional. Another thing, be careful when using the float property.

9. WordPress Admin Displaying Improperly

Have you ever logged into WordPress only to find your WP Admin Dashboard all over the place? What I mean it the links are arranged improperly because the dashboard is rendering without CSS.

Admin Display Error Causes:

  • Proxy and Firewalls that black CSS files
  • Corrupted admin menu plugins

Admin Display Error Solutions:

a. Ensure you’re not behind a proxy or firewall
If you’re behind a proxy or firewall (maybe you’re accessing your website from work), try accessing your dashboard elsewhere without proxies or firewalls. You can also try purging your firewall and proxy cache and see if that works.

b. Update/Deactivate admin menu plugins
If you are getting this error after installing a plugin such as Lighter Menus and Admin Drop Down Menu for your admin menu , try updating (re-installing) it. If this WordPress error persists, deactivate the plugin.

10. Connection Timed Out Error

If your WordPress website lives on an overburdened shared server, you will see this WordPress error more often than not. The following problems are responsible for this error.

Time Out Error Causes:

  • Heavy plugins
  • Theme function errors
  • Exhausted PHP memory limit

Time Out Error Solutions:

  • Deactivate the plugins you installed recently or reset your plugins folder
  • Increase your PHP memory limit
  • Switch to the Twenty Twelve theme to determine if the problem lies in your theme

11. Warning: Cannot Modify Header Information – Header Already Sent By

This is yet another common WordPress error that troubles many WordPress users, especially beginners. If you do encounter this error, you will usually see something similar to this:

Warning: Cannot modify header information - Header already sent by (Output started at /blog/wp-config.php:34)

That last part (Output started at /blog/wp-config.php:34) tells you exactly where your error is stemming from.

Cannot Modify Header Error Cause:

  • Presence of white (blank) spaces in the affected file (in our case above, that would be wp-config.php)

Cannot Modify Header Error Solution:

You’ll need to remove the blank spaces. To get rid of this WordPress error:

  1. Download the affected file (e.g. wp-config.php) via File Manager or FTP
  2. Open the file in your favorite editor (e.g. Notepad++)
  3. Remove all spaces before the first <?php (The first <?php should be in the first line)
  4. Remove all spaces after the closing ?>
  5. Save your file

12. The Plugin Won’t Delete Error

Some plugins (and you want to stay clear of such plugins) come with hidden files that become a pain in the neck when you want to delete the plugin. This is a good reason to only download plugins (and themes for that matter) from reputable websites you trust. The problem is you can’t delete the plugin via WordPress Admin and even if you delete the plugin’s folder via File Manager (or FTP), the plugin still appears. Magic? No. Here is the…

Delete Plugin Error Cause:

  • The plugin came with hidden or nested files

Delete Plugin Error Solutions:

a. Obtain plugins from trusted sources
Don’t go picking up plugins from all over the place. If you would like to purchase a well-coded plugin, go with reputable sources such as CodeCanyon or WPExplorer. If you’re after free plugins, check out WordPress plugin repository. Prevention is better than cure, right?

b. Deleting the plugin using Secure Shell (SSH)
This solution will only work if you have SSH access to your WordPress site. This is what to do. Login into your blog using SSH and navigate to “../wp-content/plugins/“. Use the Is -aI command to list all your folders, and finally delete the problematic plugin using the rm (folder name) command.

13. WordPress Posts Returning 404 Error

It is frustrating to access every part of your WordPress website but the posts. Every time you visit a single post, you get a 404 error page – and it’s a great pain because posts are the bones and flesh of any WordPress blog.

404 Error Page Cause:

  • Problem with your permalink settings

404 Error Page Solutions:

a. Save your permalinks
This WordPress error is easy to resolve so don’t panic – you readers will be able to read your posts in no time. Just go to Settings -> Permalinks and hit the Save Changes button.

b. Fix your .htaccess file
If fixing your permalinks does not solve this error, it is time to edit your .htaccess file manually. Navigate to your WordPress root directory and download the .htaccess file. If it doesn’t exists, create a blank text file and save it as .htaccess. Add the following code to the .htaccess file:

# BEGIN WordPress
<IfModule mod_rewrite.c>
RewriteEngine On
RewriteBase /
RewriteRule ^index\.php$ - [L]
RewriteCond %{REQUEST_FILENAME} !-f
RewriteCond %{REQUEST_FILENAME} !-d
RewriteRule . /index.php [L]
</IfModule>
# END WordPress

Save and upload the .htaccess to the same location.

14. WordPress Memory Exhausted Error

You know you’ve encountered this error when you see the white screen of death or this error message:

Fatal error: Allowed memory size of 33554432 bytes exhausted (tried to allocate 2348617 bytes) in /home/username/public_html/your_site/wp-includes/plugins.php on line 36

Memory Exhausted Error Cause:

  • A plugin or script is eating up your memory

Memory Exhausted Error Solution:

The easiest answer is to simply increase your allocated memory. To do this, open your wp-config.php file (which is found in your website’s root directory) and add the following code:

define ('wp_memory_limit', '64M');
NOTE: You don’t have to download the file (or any other file) when using the File Manager. You can edit the files right in the File Manager. Talk to your web host if you cannot find the edit option.

15. Fatal Error Undefined Function is_network_admin

I’ve decided to end this post with a simple but very common WordPress error.

Undefined Function is_network_admin Fatal Error Cause:

  • Failed auto-update

Undefined Function is_network_admin Fatal Error Solution:

Further Assistance/Resources

If we weren’t able to solve your error or your specific error wasn’t mentioned in this post you can find a list of really great resources below with some more solutions to common WordPress errors and their fixes. If you still can’t find a solution you could always try contacting your webhost to see if they can assist you! WPEngine has been there for us on more then one occasion when we couldn’t fix the issue ourselves!

Conclusion

Here we are. We just revealed 15 most common WordPress errors and showed you how to solve them. We hope this post will come in handy when you encounter a WordPress error. Bookmark this resource (you will most likely need it at some point – although we hope you don’t) and please tell us how you fix common WordPress errors on your website, especially if you have a better and quicker solution to one of the common WordPress errors.
Secure Your WordPress site

Secure Your WordPress Site:

WordPress is one of the most popular content management systems (CMS) in the world, powering millions of websites. However, its popularity also makes it a prime target for hackers and cybercriminals. In this comprehensive guide, we will outline ten essential steps to secure your WordPress site and protect it from potential security threats.

Learn how to secure your WordPress site with these 10 essential steps. From keeping your software up-to-date to using strong passwords and implementing SSL encryption, this comprehensive guide will help protect your site from potential security threats.

  1. Keep WordPress, Themes, and Plugins Up-to-Date: Regularly updating your WordPress version, themes, and plugins is crucial for maintaining a secure site. Updates often include security patches and bug fixes that address vulnerabilities. Make it a habit to check for updates regularly and install them promptly.
  2. Use a Strong Password: A strong password is the first line of defense against unauthorized access. Create a password that is at least 12 characters long and includes a combination of uppercase and lowercase letters, numbers, and symbols. Avoid using common or easily guessable information. Consider using a password manager to generate and store strong passwords securely.
  3. Limit Login Attempts: Brute force attacks, where hackers attempt to gain access by trying multiple username and password combinations, are a common threat. You can mitigate this risk by limiting the number of login attempts. Several plugins, such as Login Lockdown or Limit Login Attempts, can help enforce this restriction.
  4. Use a Security Plugin: Installing a reputable security plugin can significantly enhance your site’s security. Plugins like Wordfence or iThemes Security offer features such as firewalls, malware scanning, and intrusion detection. These tools actively monitor your site for potential threats and provide real-time protection.
  5. Regularly Backup Your Site: Regularly backing up your WordPress site is essential for disaster recovery. In the event of a security breach or data loss, you can restore your site to a previous state. Numerous backup plugins are available that automate the process, or you can manually back up your site using an FTP client.
  6. Use SSL: Implementing SSL (Secure Socket Layer) encryption on your site is crucial for protecting sensitive information, such as login credentials and personal data. SSL encrypts the data transferred between your site and visitors’ browsers, making it challenging for hackers to intercept. You can obtain a free SSL certificate from Let’s Encrypt or purchase one from a certificate authority.
  7. Regularly Scan Your Site: Performing regular scans of your WordPress site helps identify potential security vulnerabilities and malware. Security plugins like Sucuri Security or MalCare can scan your site for malware and other security issues. These tools provide detailed reports and recommendations for remediation.
  8. Limit Access to the wp-admin Directory: The wp-admin directory is a crucial area of your WordPress site that requires strict access control. By limiting access to this directory, you reduce the risk of unauthorized users attempting to exploit vulnerabilities. You can achieve this by adding code to your .htaccess file or using a plugin like iThemes Security.
  9. Disable File Editing in the Dashboard: Disabling file editing within the WordPress dashboard adds an extra layer of protection. It prevents unauthorized users from modifying your site’s code through the dashboard. To implement this, add the following code to your wp-config.php file:

define( 'DISALLOW_FILE_EDIT', true );

  1. Monitor Your Site Regularly: Regularly monitoring your WordPress site is essential to detect any security-related issues promptly. Plugins like Jetpack or Google Search Console can help monitor your site and provide notifications of potential security threats. Additionally, subscribing to security newsletters and staying informed about the latest security practices will help you proactively protect your site.

In conclusion, to secure your WordPress site requires a proactive approach and adherence to best security practices. By following these ten steps, you can significantly enhance your site’s security and protect it from potential security threats. Remember to stay updated on the latest security trends and regularly review and improve your security measures.

Fatal error With WooCommerce and PHP 8

How to fix Fatal error With WooCommerce and PHP 8

When seeking help with the issue to install and activate woocommerce with php 8, you may be facing critical  error:

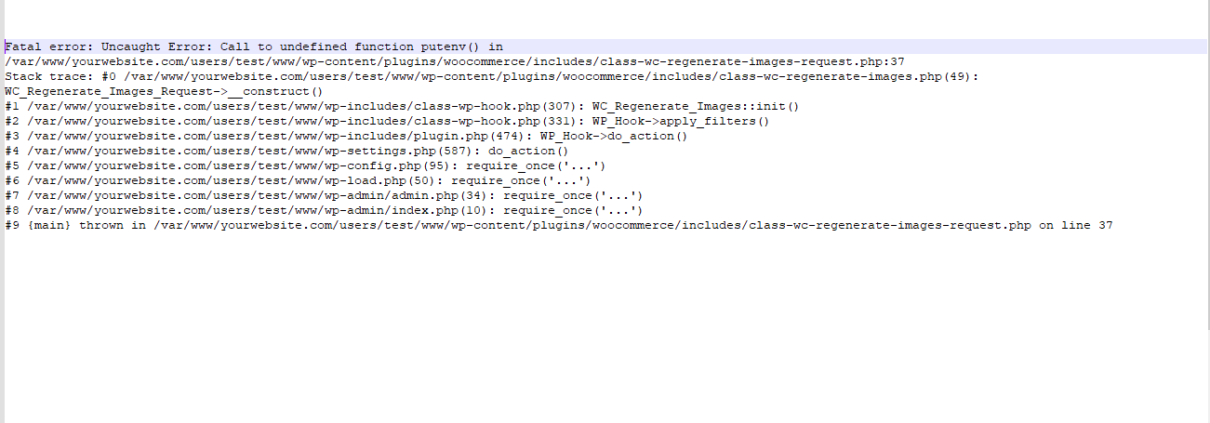
and once you try to debug the things you may end with something like:

Fatal error: Uncaught Error: Call to undefined function putenv() in /var/www/yourwebsite.com/users/test/www/wp-content/plugins/woocommerce/includes/class-wc-regenerate-images-request.php:37 Stack trace: #0 /var/www/yourwebsite.com/users/test/www/wp-content/plugins/woocommerce/includes/class-wc-regenerate-images.php(49): WC_Regenerate_Images_Request->__construct() #1 /var/www/yourwebsite.com/users/test/www/wp-includes/class-wp-hook.php(307): WC_Regenerate_Images::init() #2 /var/www/yourwebsite.com/users/test/www/wp-includes/class-wp-hook.php(331): WP_Hook->apply_filters() #3 /var/www/yourwebsite.com/users/test/www/wp-includes/plugin.php(474): WP_Hook->do_action() #4 /var/www/yourwebsite.com/users/test/www/wp-settings.php(587): do_action() #5 /var/www/yourwebsite.com/users/test/www/wp-config.php(95): require_once(‘…’) #6 /var/www/yourwebsite.com/users/test/www/wp-load.php(50): require_once(‘…’) #7 /var/www/yourwebsite.com/users/test/www/wp-admin/admin.php(34): require_once(‘…’) #8 /var/www/yourwebsite.com/users/test/www/wp-admin/index.php(10): require_once(‘…’) #9 {main} thrown in /var/www/yourwebsite.com/users/test/www/wp-content/plugins/woocommerce/includes/class-wc-regenerate-images-request.php on line 37

Fatal error With WooCommerce and PHP 8 Details

An error of type E_ERROR was caused in line 37 of the file /wp-content/plugins/woocommerce/includes/class-wc-regenerate-images-request.php. Error message: Uncaught Error: Call to undefined function putenv() in /wp-content/plugins/woocommerce/includes/class-wc-regenerate-images-request.php:37

Solution

It sounds like this function is being deliberately disabled via the disable_functions directive. A workaround, assuming a fairly standard WordPress setup, would be to create a new file at:

wp-content/mu-plugins/putenv.php

Containing:

<?php

if ( ! function_exists( 'putenv' ) ) {
	/**
	 * No-op placeholder for cases where putenv() is disabled via an .ini file.
	 *
	 * @param string $assignment
	 */
	function putenv( string $assignment ) {}
}

This might just help you to workaround this issue, however the very best course of action would be to make a correction to your PHP config (working with your web host if necessary to achieve this).

The code that calls putenv() has been in place for over 4 years and this seems to be the first time the problem has arisen (though, search functionality over on the wordpress.org is not working at time of writing—too many requests), so I may be missing something, but my inclination is that it would still be best to work things out per the above notes: this is a standard PHP function, not something that is coming from an optional extension, so it’s reasonable for us to expect it to be available.

WP Super Cache Joins the Jetpack Family

WP Super Cache, one of the oldest and most widely used static caching plugins for WordPress, is changing hands. After 15 years, the plugin’s author, Donncha Ó Caoimh, is handing over maintenance and development to Jetpack’s performance team.

Jetpack’s performance team manages the Jetpack Boost plugin, used by more than 100,000 sites, and the CDN. In today’s announcement, Jetpack assured current users that they will still be able to “enjoy its core features without a new plugin or a connection to Jetpack.”

More of the same

We’re happy to say that WP Super Cache will continue to be a great way to speed up your site for free. You can enjoy its core features without a new plugin or a connection to Jetpack.

What will be changing

While we research new features to help make WordPress sites cache faster, we will begin updating the WP Super Cache UI to bring it in line with modern standards, so it is easier to use. In addition, we’ll be working behind the scenes to ensure it’s compatible with our other performance features like Jetpack Boost.

Speed up your site

For those that aren’t familiar, WP Super Cache is a static caching plugin for WordPress. It generates HTML files served directly by Apache without processing comparatively heavy PHP scripts. This simple step should speed up your WordPress site significantly.

Reference:

https://jetpack.com/blog/wp-super-cache-joins-the-jetpack-family

https://wptavern.com/jetpack-performance-team-takes-over-wp-super-cache-development